Data Collection
Jason M. Gleditsch 1
Sebastiano De Bona 2
Mathew R. Helmus 3
Jocelyn E. Behm 4
Last Updated: 07 April 2021
Source:vignettes/120_data_collection.Rmd
120_data_collection.RmdSummary
This section is aimed at providing guidelines for the treatment of data while and after it is collected and before it is transcribed into a computer file. During this period, data is the most vulnerable to loss or other issues that decrease its usefulness. Therefore, proper data management during this period is absolutely essential!
Field Data
- Data should be recorded with dark pen and never erased or scratched out
When collecting data, a dark inked pen should be used. This ensures that information will not be lost due to pencil lead being rubbed off. Additionally, pen forces changes made to the data in the field to be tracked on the page (i.e. you cannot erase). If a mistake is made, the mistake should be crossed out with a single line and the initials of the person making the change written near the change. Information should NEVER be scratched out so much that the information being changed cannot be recovered.
If you are worried about rain or water damage to your data sheets, then you should use All-Weather paper and an archival or All-Weather pen. However, these types of pens can be expensive, so a pencil can be used when necessary (with the permission of the PIs or project lead). If a pencil is used, the data recorder needs to press hard enough that the pencil writes as dark as possible. The same guidelines for making changes in the field should be followed so that the changes can be tracked.
After each day of data collection in the field, the data sheets should be legibly photographed or scanned and saved to your project Drive Folder. This provides the most basic back up that you can go to if data is lost.
For audio-visual data, information about the data, such as the date, time, study name, person taking the recording and any other information necessary for the independent comprehension of the data, should be included as a message in the frame for images or at the start of video and audio recording. This makes the file self-identifying in case that information is lost elsewhere. For remotely collected audio-visual data, this can be done immediately after the data is collected (see the Data Formatting section).
Lab Data
- Data collected in the lab should kept together in a lab notebook and recorded in dark ink
Data collected in a lab should be collected in Lab Notebooks. Lab Notebooks can be actual notebooks and will be provided by the PI (please ask if they are not readily available). Binders should be avoided when possible in lieu of bound notebooks because pages area easily removed from or fall out of binders. If you a collecting data for the development of a product for patenting, then you are required to use a bound notebook and to review the institution’s policy on lab notebooks. Since ecological research rarely produces patented products, we will not give guidelines for keeping a legal lab notebook. However, if you want more information on this, then it is recommended you review “Writing the Laboratory Notebook” by Howard Kanares (LINK).
Key points in keeping a Lab Notebook:
Neat and legible handwriting in dark ink; not pencil if able
Procedure/Study title and purpose clearly stated
Methods described clearly and succinctly, with errors and steps taken to correct them
Calculations performed neatly showing intermediate steps
Errors crossed out with a single line, initialed, and briefly explained
All pages dated at the top and numbered at the bottom
When making a Lab Notebook, make sure to leave enough room at the beginning for a table of contents. Every new procedure, experiment, notes, calculation, etc. should start on a new page with that page being the front of the right page (i.e. the odd-numbered pages). These new pages will be what is recorded in the table of contents for each procedure, experiments, set of notes, etc. For the sake of being able to easily find a specific date or page number, the date should be recorded at the right-hand side of the top of the page and the page number should be written at the right-hand side of the bottom of the page.
All information about a procedure, experiment, notes, calculation, etc. should be recorded in the Lab Notebook. This includes data recorded on or collected with a computer system. The data should be printed out and taped (never glued) into the Lab Notebook on the appropriate page. These entries should be accompanied by a brief description of what it is. If the data collected by a computer is too large to print and tape into the notebook then the name of the data file and where it is located should be recorded along with the location of any backups/copies made.
As with the collection of field data, information in a Lab Notebook should never be completely removed from the book. Mistakes, such as misspellings, should be crossed out with a single line and initialed. It is also good practice to give a short (only a few words) reason the change was made.
Lab Notebooks should NEVER be taken out of the lab or the project lead’s possession. Ideally, Lab Notebooks should be kept in a cabinet/drawer in the lab space so that collaborators can easily find them. However, it is also acceptable for lab notebooks to be kept in the office of the project lead. To protect against Lab Notebooks being removed from the lab, digital scans or photographs of the notebook’s pages should be created periodically (ideally weekly). This allows for the consultation of the Lab Notebook when not in the lab and acts as a backup of the information in the notebook.
Data Transcription
- Digitize and back up data soon after collection
Ideally, the data should be transcribed into a computer each day after collection as well. If that is not possible, then data should be transcribed weekly. This makes transcribing data easier and reduces the chances for transcription errors for multiple reasons. First, data will not pile up, and when data piles up and transcribed all at once, errors are more likely due to rushing and fatigue. Lastly, regular data transcription helps for understanding messy handwriting in the field. The data will still be fresh in the mind of the researcher and any temporary technicians will still be around, both of which are important for deciphering handwriting.
If multiple people are transcribing data, then they should each be working with separate but identically formatted spreadsheets. This reduces the risk of someone accidentally overwriting or deleting data. It is then the responsibility of the data manager or project lead to compile this data in a reproducible way (e.g. with R script or detailed methodology). The compilation of data can occur whenever the data manager deems it necessary.
Once data is transcribed into the computer, it should be immediately backed up as described in the Data Backup section.
\[~\]
Quality Control During Transcription
-
Spreadsheets should resemble field data sheets as much as possible
- The spreadsheets are then formatted by the Data Manager
Use column rules or data entry forms for transcription quality control
Errors are often introduced into data during the transcription process. This could be due (but not limited to) interpreting messy handwriting, mistyping information, skipping over information, and/or overwriting preexisting data. There are a few steps that can be taken to reduce the risk of these occurring.
The first step that can be taken is to have only one person (preferably the data manager) create the data entry spreadsheets and have everyone use this spreadsheet to enter data. This makes sure that all the spreadsheets will have the same formatting (e.g. file type, column headers, number of columns, etc.). It would then be up to the data manager to disseminate these data entry spreadsheets to the researchers entering data. Additionally, if these spreadsheets are used for the transcription of data from data sheets, the data manager should make them to resemble the data sheets as much as possible, and then when the data has been entered or compiled the data can be formatted correctly (see Data Formatting section).
One option to reduce the errors introduced during transcription is setting column rules which reduce the risk of errors due to mistyping, skipping, or erroneous interpretation of information. The simplest way to set rules for columns within a spreadsheet is through data validation tools of the common spreadsheet software. However, these data validation tools are not required and are just recommended if there are many researchers entering data and/or you have researchers with disabilities such as dyslexia or dysgraphia working for you.
Excel
In Excel this is done by highlighting a column (that already has a header) and then clicking the “Data Validation” icon in the “Data Tools” section of the “Data” tab as shown in the figure below.

The rules for a column can be a list of values (for nominal data), a range of values that can or cannot include decimals (for numerical data), dates with a certain range, times within a certain range, or a text string of a certain length. These rules can be made using any logical operators (i.e. “between”, “not between”, “equal to”, “not equal to”, “less than”, “greater than”, “less than or equal to”, or “greater than or equal to”). They can also ignore blank cells or return an error if nothing is entered (recommended, see Data Formatting section). For nominal data, the list of values can also be displayed as a drop down menu for each cell further controlling the entry of data. However, it is important to note that in certain software, like Excel, these rules may not be case sensitive. You also can typically specify the type of error that occurs (e.g. warning or a stop error) and the message displayed if an entry breaks these rules to give the transcriber further information.
Google Sheets
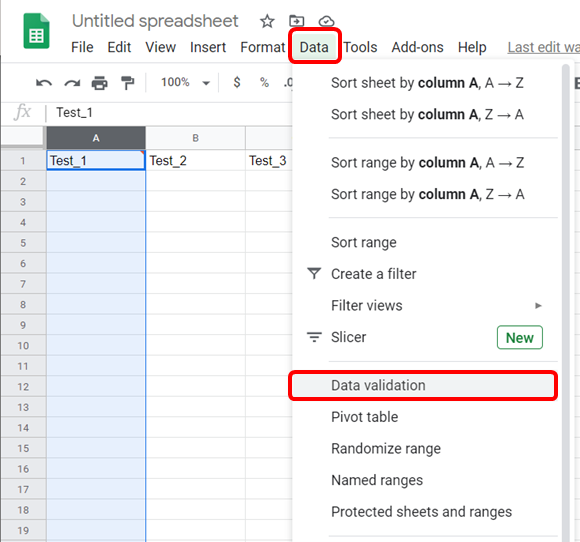
In Google Sheets this is done in a similar fashion by clicking “Data” in the top menu and then “Data Validation” in the dropdown menu that appears as in the below figure.
Google Forms
Unfortunately, these rules do not protect data that has already been entered unless the data manager regularly locks the cells with data already entered in them. To make sure this doesn’t happen while keeping the rules in place a data entry form should be used. This can be done in both Excel and Google Sheets. However, it is a little bit easier to do with Google Sheets.
Data entry forms for Google Sheets is done through Google Forms which can be created with the new button in Google Drive:

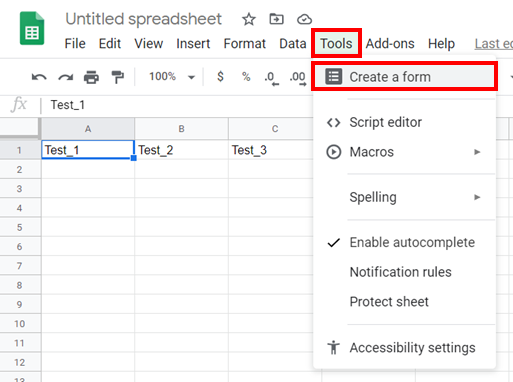
Or by opening a new Google Sheets and clicking the “Tools” in the top menu and “Create a Form” in the drop-down menu as in the figure below.
A new Google Form will be created that will create a new Google Sheets file. The Google Forms are organized by questions and will make a column in the new Google Sheets file for each question with a header equal to the question title. For each question you can have drop down menus for nominal data or other data validation rules similar to those in Google Sheets depending on the type of data that should be entered as the “Short answer” option for the question. For more advanced Google Sheets users more data friendly entry form can be created that may require a little bit of JavaScript coding and instructions can be found HERE.
Excel Forms
In Excel, you have to add the “Form” button to the Quick Access toolbar which can be done for the current spreadsheet or all spreadsheets. This is done by clicking “File” then “Options” and then select “Quick Access Toolbar” in the pane on the left-hand side of the new window that pops up. You will now see two selection panes: one to select commands and one that shows the commands already shown in the Quick Access Toolbar. Most likely you will have to select “All Commands” in the drop-down menu under “Choose commands from:” and once you do that you should be able to find and select “Form…”. With “Form…” selected you then click the “Add >>” button and then the “OK” button. You should now see the “Forms” button (shown below; although the colors may be different) at the top of the window of your spreadsheet.

Now when researcher go to enter in data, they should highlight all by clicking Ctrl+A and then clicking the “New” button to enter a new row of data. They can ‘Tab’ through the entry fields and hit enter to add the new row of data. NOTE: if the “New” button is not clicked when the form is opened it will overwrite the existing data. Any data validation rules you set for the columns will be inherited to the entry form.
Additionally, if your spreadsheet is saved onto OneDrive or SharePoint, then you can create a form that is browser based similar to that of Google Forms.
Relational Database Form GUI
If you are using a relational database, an entry graphical user interface (GUI) can be created in Access that can check entries against entries in the table(s) for data quality control. These types of data entry GUIs can also populate the related table when necessary based on the record you are entering.
Schema
Schema can also be used for quality control. Schema are files that link to your tabular data files (e.g. csv files) that assign attributes to the cells of the table, and therefore, can check for inconsistencies. However, schema require programing knowledge and may not be well suited for every type of data. For more information on schema check EML’s website and the File Documentation section.
Data Proofing
- A secondary check by someone who did not enter the data should be done
After data has been entered, someone who did not enter the data should compare the hand-written data sheet(s) to the entered data. When doing this, there should be a proofing column(s) in the data file that gets checked off once the data has been checked, and has notes for corrections and/edits that were made as well as a column for the reviewer’s names or initials. Again this is most important for when there are many researchers entering data but will always help to catch and correct any errors early. If there is only one researcher entering data, then having that researcher go back and recheck the data they have already entered at a later date (e.g. a week later) is a easy way to do data proofing even on a small project.
If there is too much data for the data proofing stage to be reasonably done, then a random subset of the data entered by each data transcriber should be proofed.
Further proofing will also be done during data formatting (see the Data Formatting section) and should be always be done before analysis.
Data Mining
- Work from master source list and compile and backup regularly
Data mining is the practice of obtaining data from large sources of data, and therefore, when data mining, it is inefficient to record data in a written format. For the purposes of this section we are also including obtaining data from scientific literature, online polls, social media, and any other digital sources of data.
These types of data are often collected using a team of researchers. Therefore, it is crucial to be organized and well documented, so you do not repeat data collection and/or lose data. Working from a master list of data sources (e.g. publications, websites, surveys, etc.) allows for researchers to sign up for the mining of certain sources, and therefore, more researchers than what is prescribed by the protocols will not collecting data from the same source. Additionally, researchers collecting data should be working with separate spreadsheets to avoid accidental deletion or overwriting of data.
The separate spreadsheets will then be compiled by the data manager. Since data mining does not have paper copies of the data, the compilation of data should occur at frequent intervals so that back-ups of the data, as described in the Data Backup section, can be made during collection.
With the creation of cloud-based file storing services, the collection of data through data mining can occur completely on the cloud. By using cloud-based services researchers can mine data from sources using their personal computers while still giving access to the data manager for frequent data compilation. Therefore, cloud-based data mining is encouraged. In this framework, the data lead will share a folder with all of the researchers on the project and the researchers would each have a sub folder containing the spreadsheet(s) they are working from. The master list(s) for the researchers to sign up for sources and subfolder(s) for the sources would be located in the root folder (i.e. the shared folder). The folder for the compiled data should not be in this shared folder to avoid accidental deletion and editing by the researchers. The only people who should have access to this folder are the project lead, data manager, and/or the PI(s) as decided by the PI(s) and project lead.
Temple University, jmg5214@gmail.com↩︎
Temple University, sebastiano.debona@gmail.com↩︎
Temple University, mrhelmus@temple.edu↩︎
Temple University, jebehm@temple.edu↩︎